
Filtering your Markdown posts
Add post filtering to your blog
Series: NextJS MD Blog, Post #2
First posted: Jun 21 2023
Read time: 8 minutes
Written By: Steven Godson
Welcome back!
Following on from my previous post Create a NextJS blog using Markdown, I will now show you how to add Category filtering to your blog so that your ordinance can choose to see all posts of a particular type.
Before we begin you will need to have followed the installation steps in Part 1 of this series
Key Files
The key files that we will be updating or creating are as follows.
./components/BlogFiltersCategory.js - this is the component that will render the interactive filter choices in the ./pages/blog/categories/index.js page.
./components/BlogFiltersMain.js - this is the component that will render the interactive filter choices in the ./pages/blog/index.js page.
The above two components are essentially the same apart from the href in the Link element, which points to different places.
./components/BlogList.js - this will need to be updated to show the categories against each posts card in the list.
./pages/blog/categories/index.js - this is the page that will filter your posts, based on the category selected, and render the list.
./pages/blog/index.js - this is the main blog page which will require minor updates to enable the filtering.
./pages/blog/[slug].js - this will need to be updated to show the categories against each post.
./global.css - This is where the styling for the dynamic components will be added.
The posts themselves will require an update to include the appropriate data into a unique entry against which the filtering can take place.
Creating your filter
Post Meta Data
The first thing that we will do is look at the metadata, which is at the front of each post, and amend it from this:
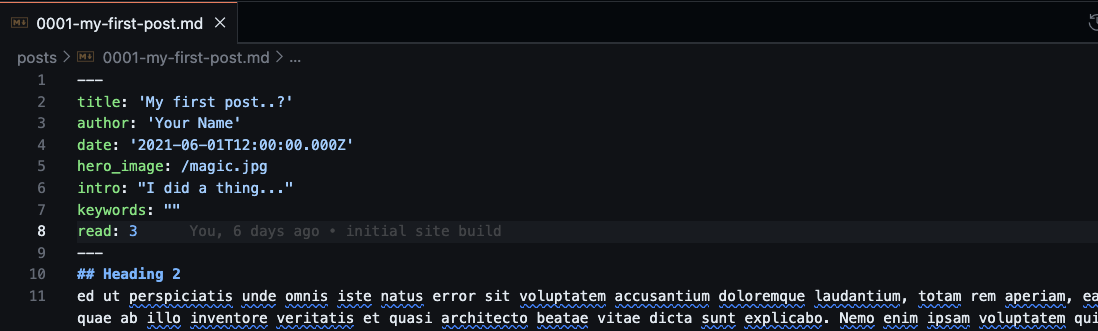
to this:
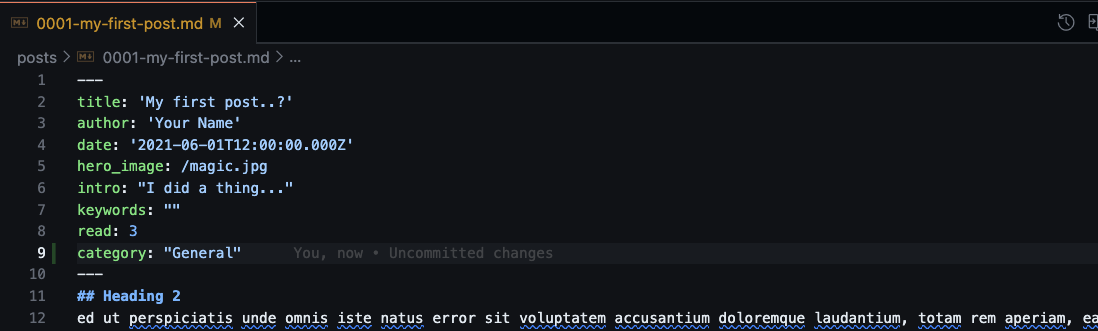
It is worth investing some time to consider what categories you want to use on your posts so that you have as complete a list as possible before we continue.
Creating new files
Now we will create the new files needed to make this work.
BlogFiltersMain.js
Create this file in the /./components/ folder and copy in the following code.
import React from 'react';
import Link from 'next/link';
import Row from 'react-bootstrap/Row';
import Col from 'react-bootstrap/Col';

function BlogFilters() {
    const filters = ['Technology', 'Business', 'Freelancing', 'Personal'];

    return (
        <Row>
            {filters.map((filter, index) => (
                <Col md={6} lg={3} key={index}>
                    <Link href={`./blog/categories?category=${filter}`}>
                        <div className={`filterTag_${filter}`}>{filter}</div>
                    </Link>
                </Col>
            ))}
        </Row>
    );
}

export default BlogFilters;
Some key points to explain are:
- I have used /react-bootstrap/ for the row and column control
- There is an array of strings in this file, this needs to represent all of the categories that you want to actively use. This has been used in place of a table that would typically be used database or CMS-based blog. To avoid duplication you could store these values in a /.env/ file
- The /href/ in the /Link/ component points to one of the new files, that we will create later in this exercise, and passes in the filter name as a URL query so that it can be picked up from the context using getServerSideProps()
- The className content is also set dynamically with the styling controlled from the /global.css/ file
BlogFiltersCategory.js
Create this file in the /./components/ folder, copy in all of the content from the /BlogFiltersMain.js/ files, and simply change the following.
<Link href={`./blog/categories?category=${filter}`}>
	<div className={`filterTag_${filter}`}>{filter}</div>
</Link>
to
<Link href={`./categories?category=${filter}`}>
	<div className={`filterTag_${filter}`}>{filter}</div>
</Link>
Categories index.js
Now we will create the page where the filtered list will render.
Create the following folder /./pages/blog/categories// and created an index.js file.
Now copy in the following code.
import React from 'react';
import Link from 'next/link';
import matter from 'gray-matter';
import Layout from '../../../components/Layout';
import BlogList from '../../../components/BlogList';
import BlogFilters from '../../../components/BlogFiltersCategory';
import styles from '../../../styles/Blog.module.css';

function Categories({blogData}) {
    return (
        <Layout>
            <h1 className={styles.heading}>Tales from the deep...</h1>

            <hr />
            <h5 className={styles.heading}>Filter by Category or <Link href="../../blog">Back to Full List</Link></h5>
            <BlogFilters />
            <hr />

            <BlogList allBlogs={blogData} />
        </Layout>
    );
}

export default Categories;

export async function getServerSideProps(context) {

    const { req } = context;
    const passedURL = req.url;
    let filterName = passedURL.split('=');
    filterName = filterName[1];

    const webpackContext = require.context('../../../posts', true, /\.\/.*\.md$/);
    const keys = webpackContext.keys();
    const reverseKeys = keys.reverse();

    const values = reverseKeys.map(webpackContext);

    const posts = reverseKeys.map((key, index) => {
        const slug = key
            .replace(/^.*[\\\/]/, '')
            .split('.')
            .slice(0, -1)
            .join('.');

        const value = values[index];
        const document = matter(value.default);

        return {
            frontmatter: document.data,
            markdownBody: document.content,
            slug,
        };
    });

    const filteredPosts = (posts, filterName) => {
        const data = posts.filter((post) => post.frontmatter.category === filterName);
        return data;
    };

    let data = filteredPosts(posts, filterName);

    return {
        props: {
            blogData: data,
        },
    };
}
This file is very similar to the main index.js in the ./pages/blog/ folder.
The key differences are:
- The use of getServerSideProps instead of getStaticProps. The reason for this is so that we can access the context API and pull the filter name that is passed from the filter components. This gets stripped from the request URL and passed into the filteredPosts function so the list of all posts can be filtered
- Use of the BlogFiltersCategory.js functionality. This ensures that a user clicking on categories after the initial filter will not be thrown back to the main blog page
- Reuse the BlogList component so there is a consistent look and feel to the site
global.css
If you want to follow the same styling approach then copy the following into the ./styles/global.css file.
.tag_Technology,
.tag_Freelancing,
.tag_Personal,
.tag_Business {
    text-align: center;
    background-color: var(--secondary-color);
    color: var(--primary-color);
    padding: 0.2rem 0;
    letter-spacing: 2px;
    font-size: 1.5rem;
}
.tag_Freelancing {
    background-color: #00796b;
}
.tag_Personal {
    background-color: var(--primary-color);
    color: var(--secondary-color);
}
.tag_Business {
    background-color: darkblue;
}

.slugTag_Technology,
.slugTag_Freelancing,
.slugTag_Personal,
.slugTag_Business {
    text-align: center;
    background-color: var(--secondary-color);
    color: var(--primary-color);
    padding: 0.2rem 0;
    letter-spacing: 2px;
    font-size: 1.5rem;
    min-width: 250px;
    border-radius: 5px;
    margin-bottom: 2rem;
}
.slugTag_Freelancing {
    background-color: #00796b;
}
.slugTag_Personal {
    background-color: var(--primary-color);
    color: var(--secondary-color);
}
.slugTag_Business {
    background-color: darkblue;
}

.filterTag_Technology,
.filterTag_Freelancing,
.filterTag_Personal,
.filterTag_Business {
    text-align: center;
    background-color: var(--secondary-color);
    color: var(--primary-color);
    padding: 0.2rem 0;
    letter-spacing: 2px;
    font-size: 1.5rem;
    width: 100%;
    border-radius: 5px;
    margin-bottom: 1rem;
    cursor: pointer;
}
.filterTag_Freelancing {
    background-color: #00796b;
}
.filterTag_Personal {
    background-color: var(--primary-color);
    color: var(--secondary-color);
}
.filterTag_Business {
    background-color: darkblue;
}
If you are using another approach e.g. SASS, Bootstrap, or TailwindCSS then you can skip this section.
Updating the existing document
Now that we have created the new pages and components we can move on to updating the existing pages and components to bring it all together.
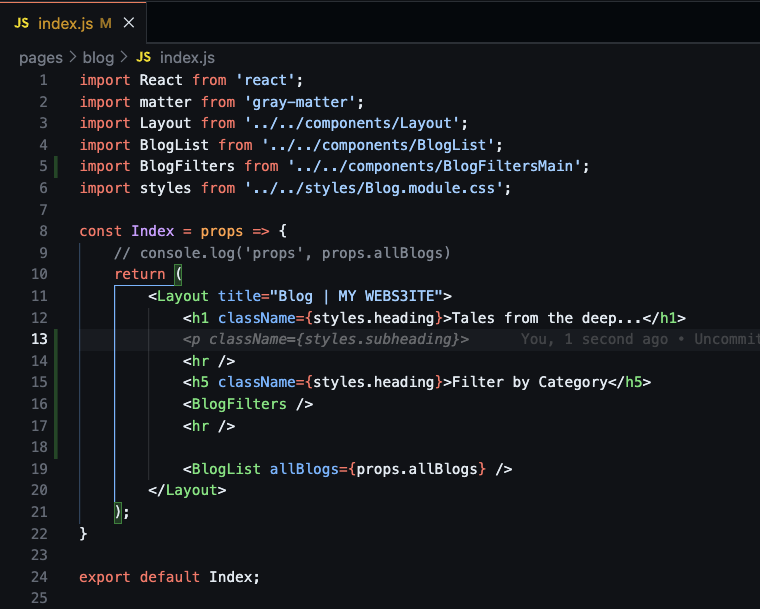
Blog index.js
Update the ./pages/blog/index.js page to include the BlogFilterMain.js component as shown below.
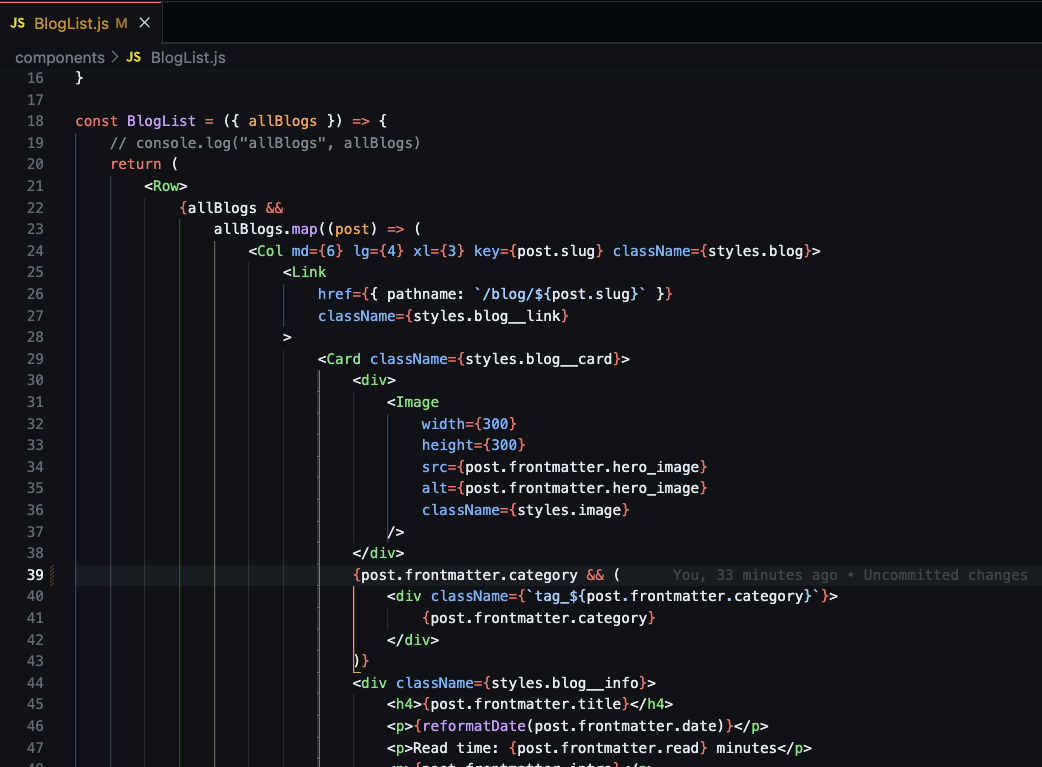
BlogList.js
Now we update the BlogList component to render out the category name that has been added to a blog. I have done this as a conditional statement but, if you are sure it will always be added, you can add it without the conditional.
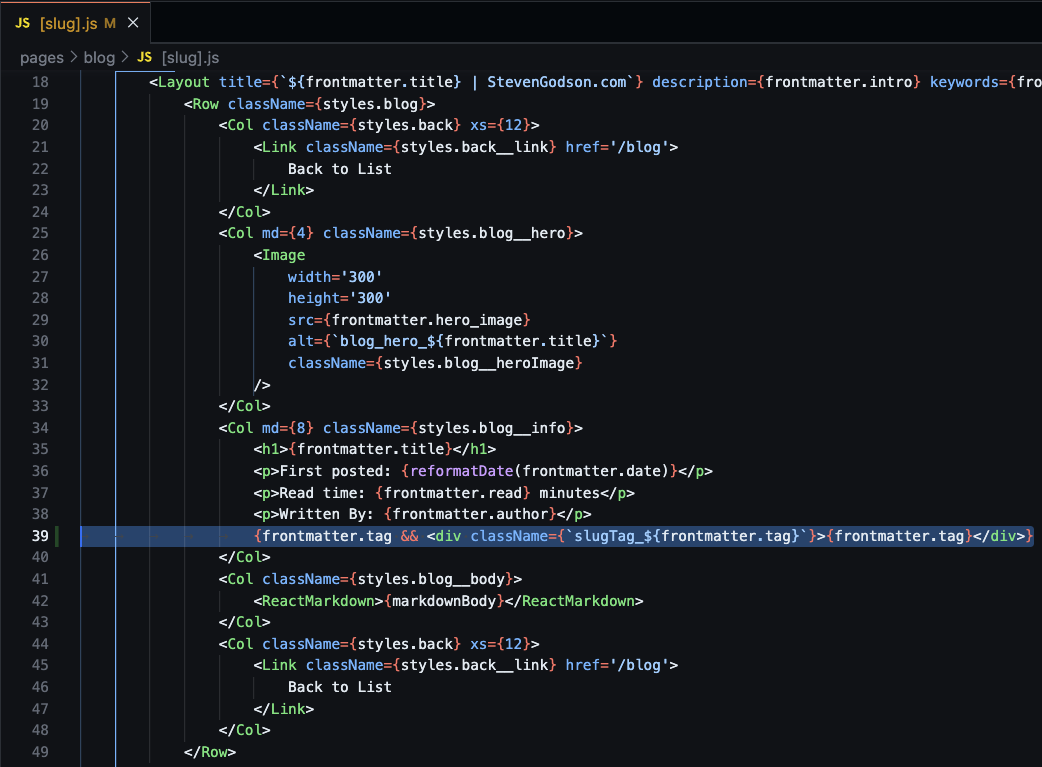
Blog [slug].js
Finally, we will update the page, where all the content of an individual post is shown, to show the category name as well.
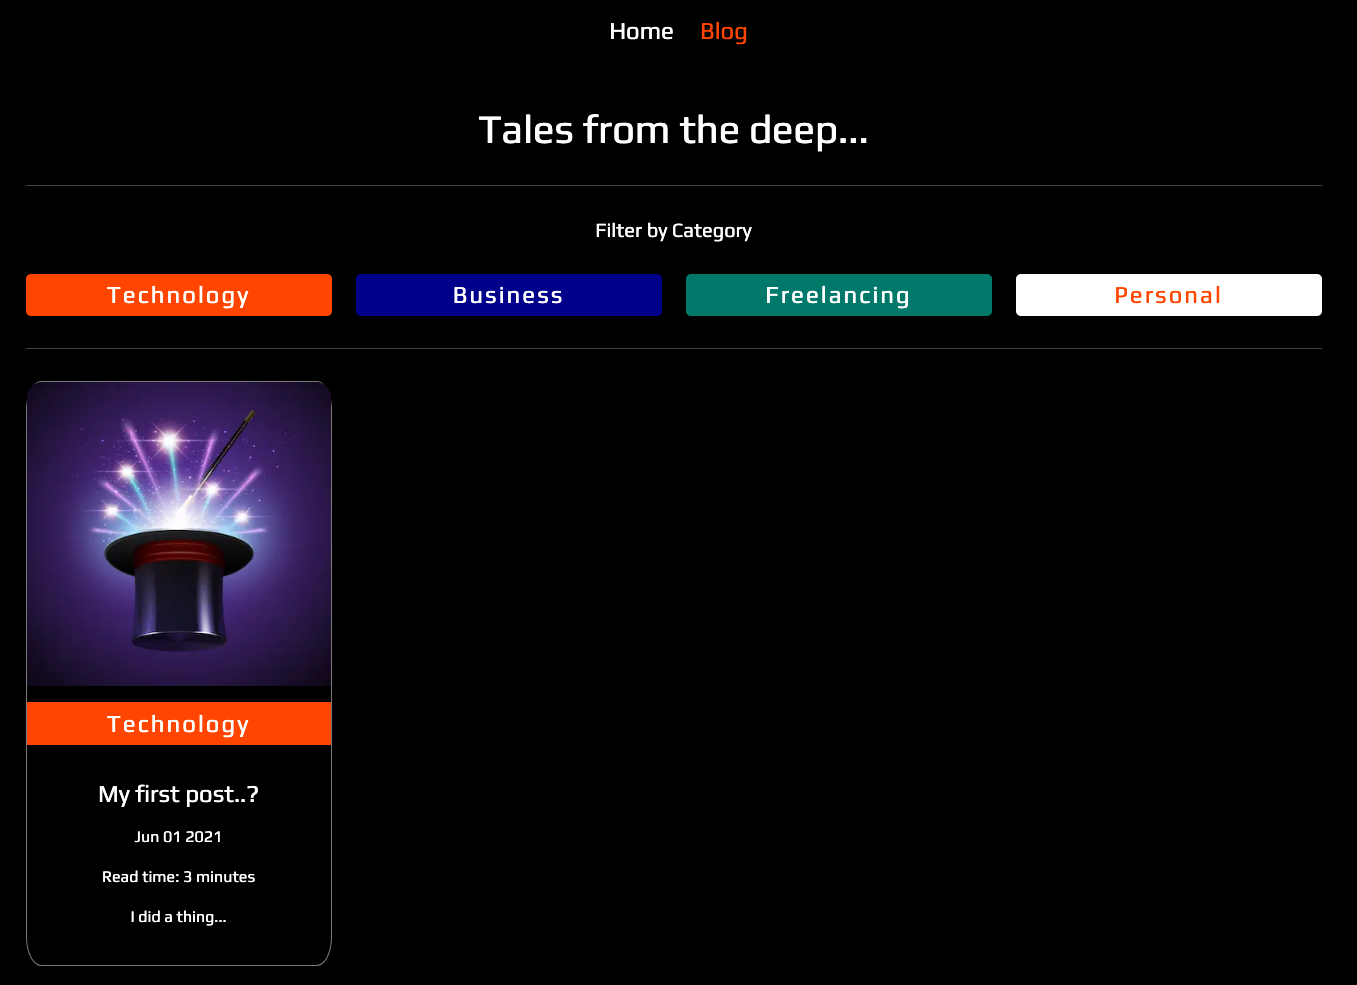
Let's fire it up…
We are now ready to run the project and see our content. To do this you simply need to:
- navigate to the root folder in your terminal and run
npm run dev - open your browser navigate to http://localhost:3000/blog
The following should be visible on the screen.
And that’s it for now… you have now updated your blogging site, using Next’s and Markdown, and enhanced the experience of your readers. Hopefully, you found this article useful and will continue your journey.
In the next post of the series, we will be adding further functionality to your main index.js page by adding functionality for * latest posts*.
Thanks for stopping by…